Advanced Configuration
This document describes the advanced configuration options of ParksTool products.
Encoder Settings
Encoder Resolution (Default: 4)
Sets how many steps to send per click (detent).
For detent type, 1 is recommended.
For smooth rotary type, 4 is recommended.
Detent type provides tactile feedback with each detent. To send one signal per detent, 1 is recommended.
In other words, resolution determines how many values to send per detent angle.
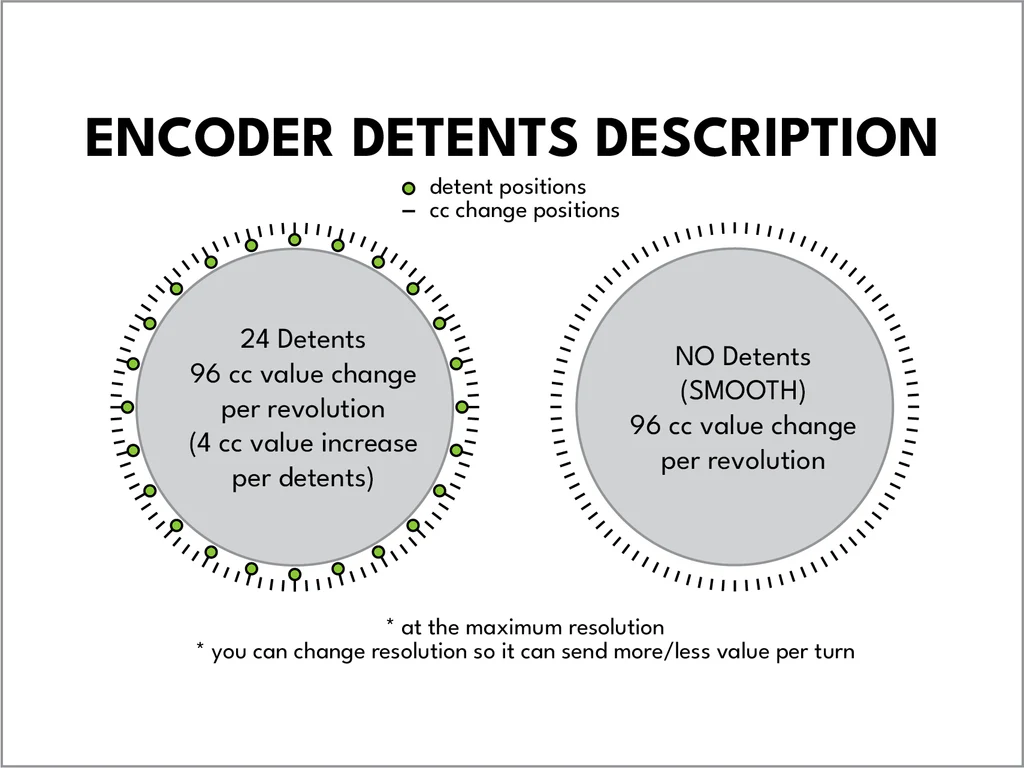
The above image shows the relationship of encoder resolution when Acceleration is not used at all.
Encoder Acceleration Level (Default: 8)
The faster you turn the encoder, the more values are transmitted. Setting it to 0 turns off this feature.
Potentiometer / Fader Settings
Smooth Filter Level (Default: 4)
Accumulates input values multiple times and transmits the average.
Higher values provide smoother operation but may slow response time.
If MIDI messages are transmitted even when no operation is performed, it is recommended to increase this value.
Divider (Default: 10)
Divides the input range by this number, transmitting values that many times from minimum to maximum position.
For example, setting it to 3 will transmit 3 values. It’s like deciding how many slices to divide a pizza into.
Note: Does not affect MIDI Normal / Pitchbend modes.
Expression Pedal Deadzone Low (Default: 30, Firmware 9.0.3+)
Expression pedal only. If the value does not go all the way down to 0 when the pedal is fully pressed down, increase this value to compensate.
Expression Pedal Deadzone High (Default: 40, Firmware 9.0.3+)
Expression pedal only. If the value does not go all the way up to 127 when the pedal is fully pressed up, increase this value to compensate.
CC / NOTE Range Settings
Minimum Value (Default: 0)
Sets the minimum value for knobs, faders, and encoders. For example, if you want the minimum value to be 10, set this value to 10.
Maximum Value (Default: 127)
The maximum value that can be transmitted. If only up to 100 is needed, it can be set to 100.
General Flags
ENABLE DEEJ (Default: Disabled)
Transmits Deej compatible serial messages. May affect system performance.
Warning
Deej support has been completely removed as of firmware 9.3.0. This setting no longer has any effect. To continue using Deej, please use firmware 9.2.x or earlier.
DISABLE LED (1ES2K only, Default: Disabled)
LEDs can be turned off to save resources.
DISABLE TRS OUT (Default: Disabled)
TRS MIDI output can be turned off. It is always on by default.
IGNORE MIDI IN
Added in firmware 9.0.2+. Ignores MIDI messages sent from external applications to the device.
Bank-related Flags
ENABLE BANK LOOPING (Default: Disabled)
When increasing/decreasing Banks and exceeding the range, it cycles back to the first Bank.
ENABLE ANTI-JUMPING (Default: Disabled)
Potentiometer/Fader only. When changing Banks, it remembers the previous position and does not send MIDI messages until reaching that position (value jump prevention feature).
ENABLE OCTAVE ONLY MODE (Default: Disabled)
A mode for the 13-key keyboard (13K1ES-D24) where the encoder shifts the whole keyboard up and down by octaves, so all octaves can be played from just 13 keys. From firmware 9.6.0 it is located under Global Variables → ETC FLAGS in the Web Configurator. See the Octave-Only Mode section for the full behavior.
BURST MODE (Default: Disabled)
When enabled, messages registered across multiple Banks are bundled and sent together. Transmitted from the highest Bank down to the lowest Bank.
For example, set MSB/LSB (MIDI Custom) on Bank 1 and Program Change on Bank 0. When a key is pressed, MSB/LSB will be sent first, followed by the Program Change.
Can also be used to create chords.
Cannot be used together with ENABLE ONLY OCTAVE MODE.
Octave-Only Mode
This mode is for the 13-key keyboard product (13K1ES-D24 — 13 keys + 1 encoder). The 13 keys cover only a little more than one octave, but with this mode turned on the encoder shifts the whole keyboard up and down by octaves, letting you play the full MIDI range (notes 0–127) from just 13 keys.
In this mode the bank function is turned off and the encoder handles octave shifting.
How to turn it on
In the Web Configurator, check ENABLE ONLY OCTAVE MODE under Global Variables → ETC FLAGS.
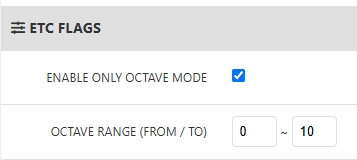
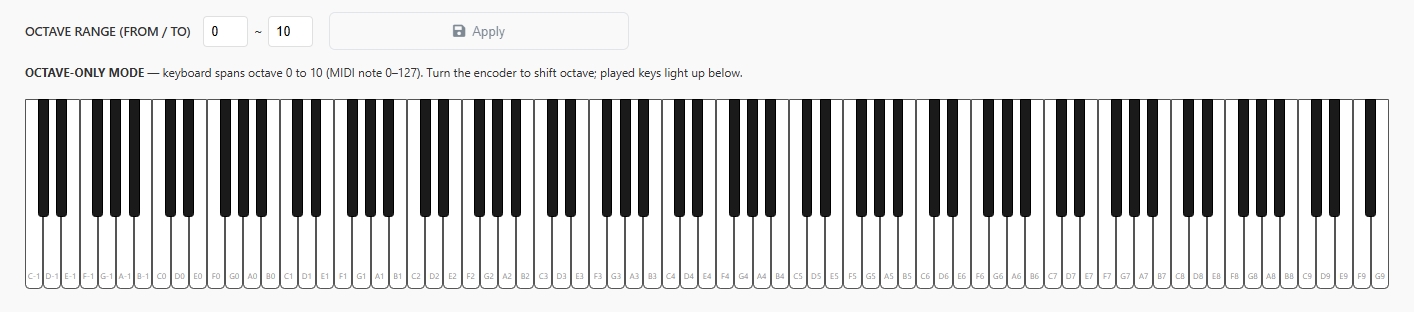
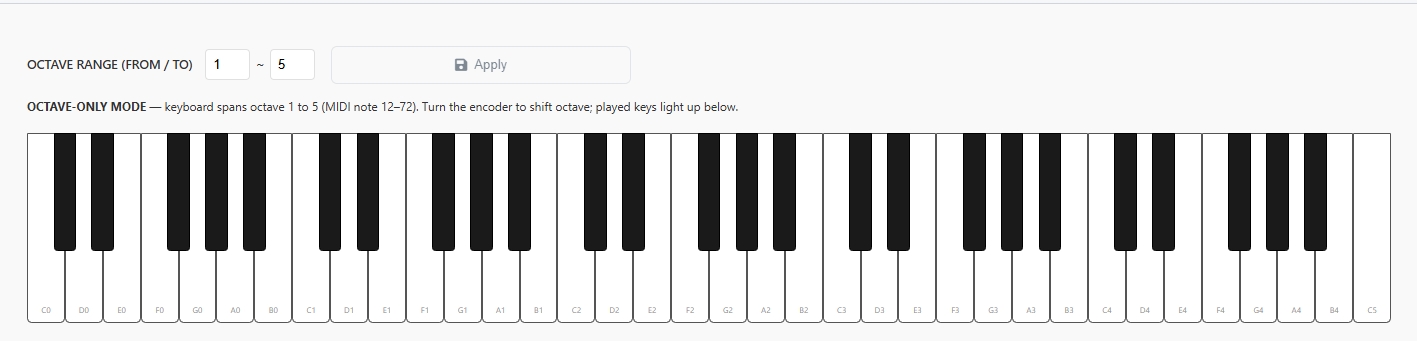
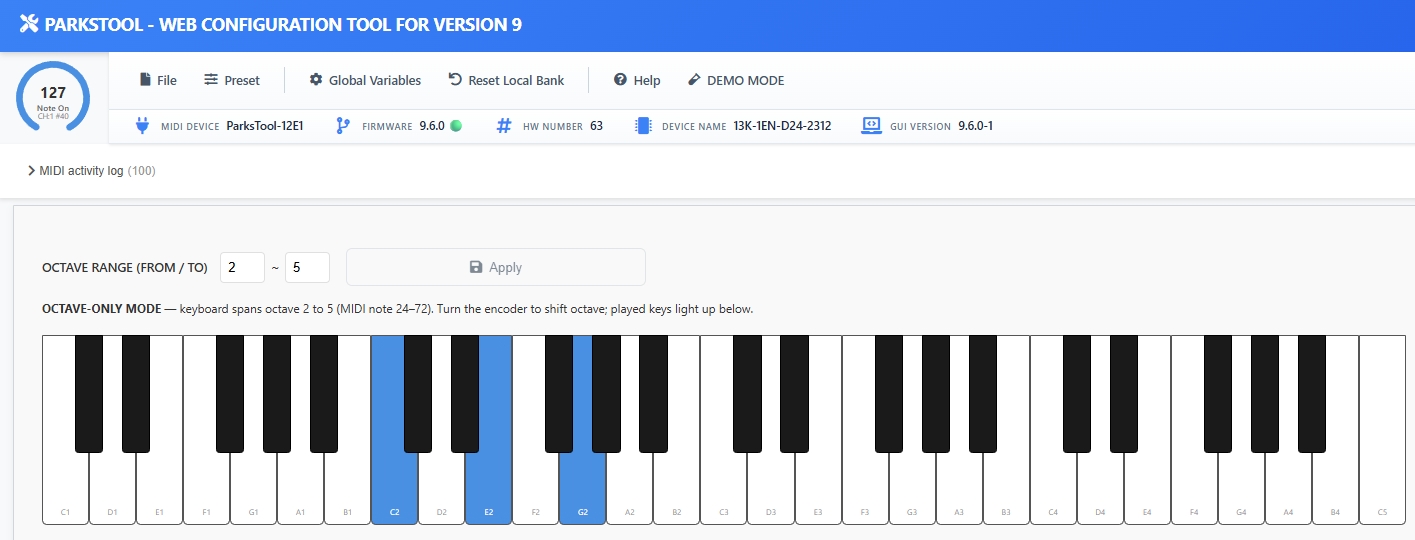
Octave range (OCTAVE RANGE — FROM / TO)
Set the lowest octave (FROM) and the highest octave (TO) the encoder can reach. After changing the values, press Apply to save them to the device.
The default is 0 – 10, which covers the entire MIDI range (notes 0–127).
FROM cannot be greater than TO.
You can narrow the range to just what you need. For example, if you only use 5 octaves when playing, limiting the range means you won’t pass through unused octaves while turning the encoder.
OCTAVE RANGE |
Actual range |
|---|---|
0 – 10 (default) |
Notes 0–127 (full range) |
1 – 5 |
Notes 12–72 |
2 – 5 |
Notes 24–72 |
Encoder (knob) behavior
Turning the encoder clockwise shifts up one octave, and counter-clockwise shifts down one octave.
Exactly one octave per detent (click). Turning one notch never skips an octave or shifts by less.
It moves only within the OCTAVE RANGE set above, never below FROM or above TO.
If you change octave while holding a key, a note off is sent for the note that was sounding at that moment, so it stops. This prevents a stuck note (a note that keeps ringing) from the previous octave.
Showing the keys being played
The Web Configurator lays out the keyboard on screen to match the current octave range. When you press a key, that key lights up blue, so you can see at a glance which note in which octave you are playing. (The image below shows C2, E2 and G2 pressed at once.)
LED Settings
note
LED color customization is limited to specific models (e.g., 1ES2K) and applies only to the first Bank. Other Banks are fixed with predefined colors. To turn off all colored LEDs, enable the DISABLE LED option.
Value Storage System
Auto Value Saving (Firmware 8.0.11+)
Save Timing: Auto-save after 60 seconds of inactivity
Immediate Save: Saves immediately when changing Banks
Memory Lifespan: Rated for 100,000 write cycles
Optimization: Duplicate values are not written, preserving memory life
Multiple Devices from ParksTool
Multiple ParksTool products can be connected and used together. However, each device’s name must be changed, which can be done through firmware updates.
Scene Workflow — Virtual Fader / Scene Capture (firmware 9.5)
The 9.5 series builds on the 9.4 Scene v2 model and seriously refines DAW integration and scene workflow. The latest is 9.5.12.
The core idea of this release is “move smoothly between DAW values and device scenes”. During a live setup or mix session, you can pull fader movements created by DAW automation straight into a device scene, or push a scene from the device to your DAW with a single key press.
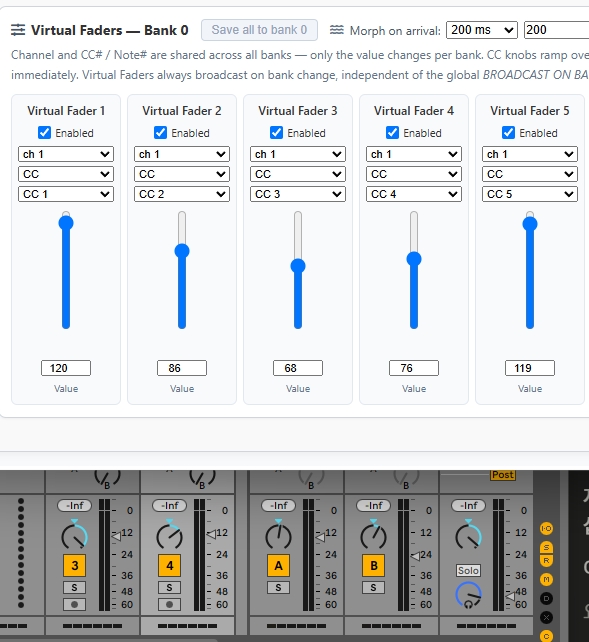
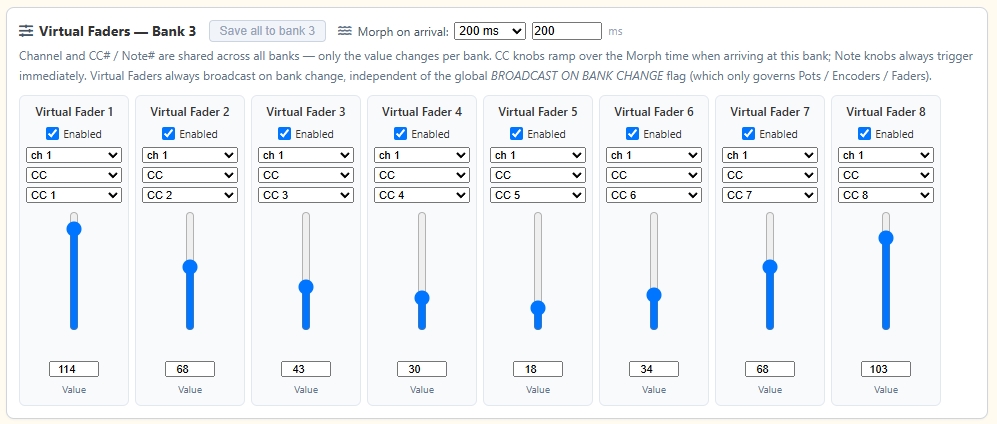
Virtual Fader — 8 virtual faders inside the device
You can have 8 virtual faders inside the device even without physical faders or knobs. That means small models without physical faders (like 1ES2K) get the same capability, and users who need 8 additional channels beyond their device’s physical faders get it too.
Each virtual fader is configured as follows:
Carries its channel + CC# (or note number) + type + on/off as global settings shared across every bank. Set it once and it points to the same target from every bank. For example, if VF#1 is Channel 1 / CC 7 (Volume), then VF#1 always means “Channel 1’s Volume” in every bank.
Stores its value per bank. A bank is a scene, so each scene has its own set of 8 fader positions. For example, bank 0’s VF#1 = 80 (verse volume), bank 1’s VF#1 = 110 (chorus volume).
When you switch banks (= scenes), the 8 values for that bank are sent to the DAW all at once. One key press can switch 8 parameters — EQ, volume, send, panning, etc. — simultaneously.
Typical use patterns:
Live performance: Map each song’s EQ/volume/effect set to its own bank. At transitions, a single BANK + press reconfigures every channel at once.
DJ set: Configure four banks each with a different channel mix. Switch the entire mood with one press as the set progresses.
Studio mixing: Store separate EQ + volume + send combinations for verse / chorus / bridge of the same track across banks, then A/B between them quickly.
Virtual controller: Even on models without physical faders, the 8 virtual faders act as a virtual mixing surface.
In the Virtual Fader card of Web Configurator, set the channel and CC#, then drag the sliders to your target value in each bank to complete that bank’s scene.
Per-bank morph time — smooth scene transitions
Instead of having virtual fader values jump abruptly to the new bank’s values, you can have them transition smoothly. The DAW receives a sequence of linearly interpolated intermediate CC values, so volume / EQ on the DAW side flows naturally rather than spiking.
Transition time can be set per bank. For example:
Bank 0 → Bank 1: 100 ms (effectively instant, but avoids click pop)
Bank 1 → Bank 2: 1500 ms (slow build-up)
Setting guide:
0 ms: Instant jump. Good for quick set switches without DAW automation.
50–100 ms: Sounds instant to the human ear but avoids click/pop noise. A safe default.
250–500 ms: Smooth fade. Natural transitions within a song.
1000–3000 ms: Slow build-up / down. For song-to-song transitions in live performance, mood changes.
Several seconds or more: Gradual change. Ambient, film scoring, stage sound effects, etc.
Enter ms directly or pick a preset (250 / 500 / 1000 / 2000, etc.). 0 means instant jump; positive values mean linear interpolation over that duration.
Scene Capture — absorb DAW-sent values into a scene (9.5.12+)
The biggest change in the 9.5 series — the feature that completes the bidirectional flow between the device and the DAW.
Until now, only the device → DAW direction was meaningful. Move a slider and the DAW receives the value. From 9.5.12, the DAW → device direction also becomes meaningful. When incoming messages match a Virtual Fader’s channel/CC — from DAW automation playback, another MIDI controller’s movement, or another DAW’s output — the value is captured inside the device.
Visual representation: A blue ghost bar blinks next to the slider in Web Configurator with about a 1-second period, indicating “the DAW-sent value”. The slider thumb itself still points to the bank’s saved value; the ghost floats separately next to it. So at a glance:
Slider thumb (the black handle): the value permanently stored in this bank
Ghost bar (the blue blink): the value the DAW just sent (not yet saved)
The ghost appears only when the two values differ, and disappears automatically once they match.

Saving (commit):
You can permanently store the ghost value into the current bank’s scene in two ways:
Savebutton next to the slider: save just that one fader (leaving the other 7 alone)Save all to bank Nbutton at the top of the card: save all 8 changed faders at once
If you don’t save, the ghost keeps blinking as a live indicator. The ghost resets when you switch banks, so save before switching if you want to keep the captured state.
Practical flow (from the DAW user’s perspective):
In Web Configurator, set up the routing for all 8 Virtual Faders (for example: VF#1 = Channel 1 CC 7).
With Web Configurator open, play DAW automation or send matching channel/CC values from an external MIDI controller.
Ghost bars start blinking next to matching VFs — you can see the DAW-sent value right away.
Like what you see? Click
SaveorSave all to bank N. The slider thumb moves to the ghost’s position and the value is written to EEPROM — surviving reboots and future sessions.
Example use cases:
Found an EQ combination you like in DAW automation → during playback, one click of
Save all to bank 2permanently stores those 8 fader positions as bank 2’s scene. On the next gig/session, switching to that bank sends the same EQ instantly.Preserve a fader position you improvised live → click
Savenext to that fader. Only that slot updates; the others stay untouched.Capture a single moment from a DAW automation curve → draw a precise automation curve, then pull a specific moment from it into a device scene. From then on, one key press recalls that moment instantly.
Absorb another MIDI controller’s setup into the device → import the settings you built on a big mixer or another controller into your ParksTool device’s 8 scenes, then carry just the small device.
Automation experimentation / learning → try out which values work for different song parts using DAW automation, then commit only the combinations that worked to the device banks. Trial and error yields only the keepers, preserved permanently.
Bank Shift Keys preset (9.5.12+)
For the Scene flow above to be practical, BANK -/+ keys have to work in every bank. Otherwise you may get stuck in a bank that doesn’t have working bank-shift keys.
Clicking Preset → Bank Shift Keys (all banks) in Web Configurator automatically configures the device’s last two KEYs (second-to-last = BANK -, last = BANK +) as BANK_FEATURE, and applies this to every bank.
Why the last two keys: the first two keys are usually mapped to the most frequently used notes / CCs, so reserving the less-used keys at the end for BANK shifting is more natural. On a device like 1ES2K (2 keys total), both keys become BANK -/+.
Because KEY settings are stored per bank, previously a BANK key working in one bank could behave differently in another — confusing. With one click, this preset fixes both keys as BANK -/+ across every bank.
Verification after applying: Navigate to each bank and confirm in Web Configurator that the last two keys are set to BANK_FEATURE with 113 (BANK -) or 114 (BANK +).
Getting started — build your first scene
If Scene v2 is new to you, follow this sequence.
Update to firmware 9.5.12 and open the Configurator tab in ParksTool Uploader, or visit config.parkstool.com.
Under Global Variables → BANK FLAGS, check “Broadcast on Bank Change”. This makes values automatically transmit on bank switch.
Go to the Virtual Fader card and configure routing for VF#1 through VF#8. Example:
VF#1 = Channel 1 / CC 7 (Volume)
VF#2 = Channel 1 / CC 10 (Pan)
VF#3 = Channel 1 / CC 11 (Expression)
VF#4–8 = any other channel/CC you want
Build bank 0’s scene: drag the VF sliders to your target values.
Move to bank 1 with the BANK + key (or the BANK + button in Web Configurator). The VF sliders start at 0 — configure bank 1’s scene differently.
Repeat steps 4–5 to fill banks up to around 4.
Click Preset → Bank Shift Keys (all banks). The last two keys become BANK -/+ across every bank.
Test: Press the last two keys to switch banks. Confirm that the DAW receives each bank’s values instantly (or smoothly transitioned by morph time).
(Optional) Adjust per-bank transition time with Morph time.
(Optional) Refine your scenes by absorbing DAW automation results via Scene Capture.
Smaller improvements
Encoder LED ring refreshes immediately on bank change (9.5.8+): When you change banks, the LED is redrawn at the new bank’s last value position right away. Previously it kept showing the old bank’s position until you nudged the knob.
Web Configurator heartbeat (9.5.4+): While Web Configurator is open it sends a signal every 30 seconds, keeping the device in “web mode”. During that time the device automatically pushes live Virtual Fader values, so the Scene Capture flow above runs smoothly.